Computer Maintenance
Why is Maintenance Necessary?
If you have read
How Computers Work
you will understand that a personal computer is an extremely complex and dynamic system.
When the system is brand new it should work perfectly,
but as time goes on it inevitably deteriorates.
Every time a program is added, removed or updated - the system changes.
Every time you use the computer to edit documents, browse the web or use email - the system changes.
Anyway, the system is constantly changing due to automatic background tasks.
Sometimes these changes are an improvement,
sometimes they will merely slow down the computer,
but in the worst case the entire system will stop working after an apparently innocent change.
In any case, superfluous and sometimes dangerous files and settings accumulate in the system over time.
If you use a broadband internet connection these files will accumulate very fast, and might include spywares and viruses.
The long-term stability of your personal computer is dramatically improved by regularly performing some routine maintenance tasks.
Making Maintenance Easy
The maintenance tasks can be run manually or automatically.
Even if you have some automatic maintenance there is no substitute for checking everything manually.
Computers go wrong and if you haven’t checked it yourself then you cannot be sure that it is working properly:
Automatic Maintenance Using Scheduled Tasks
It is possible to schedule maintenance tasks using Windows Task Scheduler and other tools.
However it is too difficult to provide instructions here as there are several complications with this approach:
- A spyware scan using LavaSoft Ad-Aware SE Personal is not easy to configure.
- Microsoft Updates are scheduled using the Automatic Updates applet in the Windows Control Panel.
- A virus scan using Norton Internet Security is scheduled using the Scans tab on the Norton AntiVirus page in Norton Internet Security.
- Disk Cleanup and Disk Defragmenter can be scheduled using the Windows Task Scheduler.
-
Scheduled maintenance tasks normally run during the night or the weekend so the computer must be left running.
You should configure power management so that the computer consumes less electricity, using the Power Options applet in the Windows Control Panel.
- The timing of individual scheduled tasks must be carefully chosen so that each task has plenty of time to finish before the next task starts.
-
Even if you have scheduled maintenance tasks it is essential that you regularly check that they are running correctly.
Ideally you should keep paper maintenance log sheets,
but alternatively you can run a manual maintenance cycle as described below:
Manual Maintenance Using a Desktop Folder
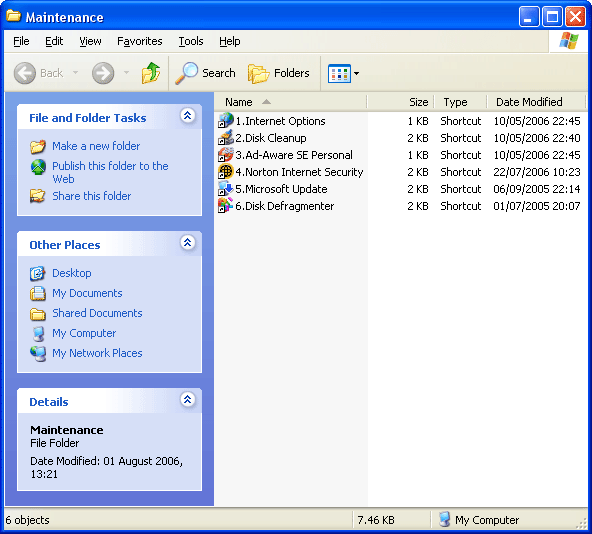
I create a Maintenance folder on the desktop of every computer I administer on behalf of my clients, friends and family.
This contains several numbered shortcuts to the appropriate maintenance tasks.
A typical Maintenance folder looks like this:
This is a screenshot - not a real window!
This is a screenshot - not a real window!
|
If you don’t have a Maintenance folder on your desktop,
I recommend that you create one straight away -
feel free to contact me if you need help with this...
Now I will take you through a typical manual maintenance cycle
(on a Windows XP Home Edition computer with Norton Internet Security 2006 and LavaSoft Ad-Aware SE Personal Edition
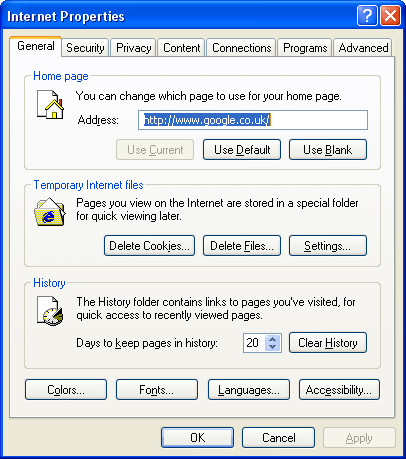
Internet Options
Use this shortcut to delete cookies and temporary internet files.
Please note that you will lose saved settings for websites that you have visited:
-
Double-click the Internet Options shortcut and the Internet Properties dialog box appears showing the General tab:
This is a screenshot - not a real window!
This is a screenshot - not a real window!
|
-
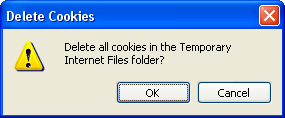
Click the Delete Cookies... button and the Delete Cookies message box appears:
This is a screenshot - not a real window!
This is a screenshot - not a real window!
|
- Click the OK button to return to the Internet Properties dialog box showing the General tab.
-
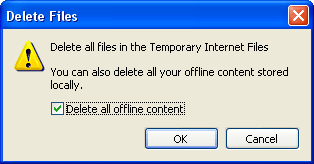
Click the Delete Files... button and the Delete Files dialog box appears:
This is a screenshot - not a real window!
This is a screenshot - not a real window!
|
- Check the Delete all offline content checkbox (as shown above).
- Click the OK button to return to the Internet Properties dialog box showing the General tab.
- If you have accumulated a lot of temporary internet files your mouse cursor might show an hourglass for a few minutes while they are deleted - wait until the mouse cursor has returned to normal.
-
Click the OK button and the Internet Properties dialog box disappears.
You have successfully deleted your cookies and temporary internet files!
Disk Cleanup
Use this shortcut to run Disk Cleanup and delete various temporary system files:
-
Double-click the Disk Cleanup shortcut and the Disk Cleanup dialog box appears:
This is a screenshot - not a real window!
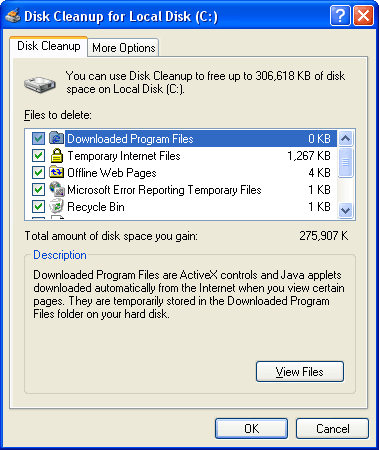
This is a screenshot - not a real window!
|
- Check all of the checkboxes (as shown above) except for the Compress Old Files option.
-
Click the OK button and the Disk Cleanup message box appears:
This is a screenshot - not a real window!
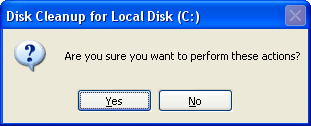
This is a screenshot - not a real window!
|
-
Click the Yes button and the Disk Cleanup progress box appears:
This is a screenshot - not a real window!
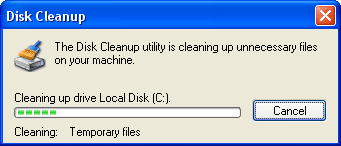
This is a screenshot - not a real window!
|
-
Wait until the Disk Cleanup progress box disappears.
You have successfully run Disk Cleanup.
Ad-Aware SE Personal
Use this shortcut to update the Ad-Aware SE Personal definitions and delete spyware:
- Double-click the Ad-Aware SE Personal shortcut:
-
If your definitions are not very old the Ad-Aware SE Personal window showing the Ad-Aware SE Status page appears as in step 6.
Skip steps 2 to 6 and proceed to step 7.
- If your definitions are old, this message box appears:
This is a screenshot - not a real window!
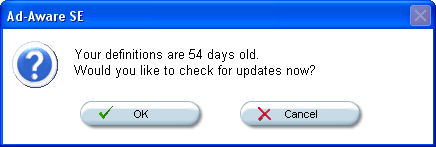
This is a screenshot - not a real window!
|
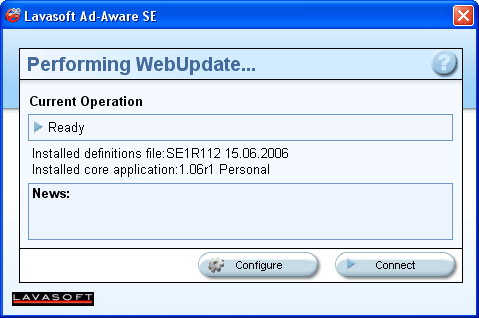
-
Click the OK button and the Performing WebUpdate (Ready) dialog box appears:
This is a screenshot - not a real window!
This is a screenshot - not a real window!
|
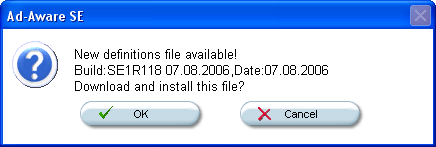
-
Click the Connect button and this message box appears:
This is a screenshot - not a real window!
This is a screenshot - not a real window!
|
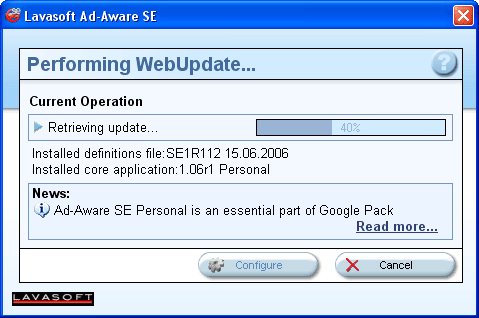
-
Click the OK button and the Performing WebUpdate (Retrieving update) progress box appears:
This is a screenshot - not a real window!
This is a screenshot - not a real window!
|
-
Wait until the update has been retrieved and the Performing WebUpdate (Webupdate complete) dialog box appears:
This is a screenshot - not a real window!

This is a screenshot - not a real window!
|
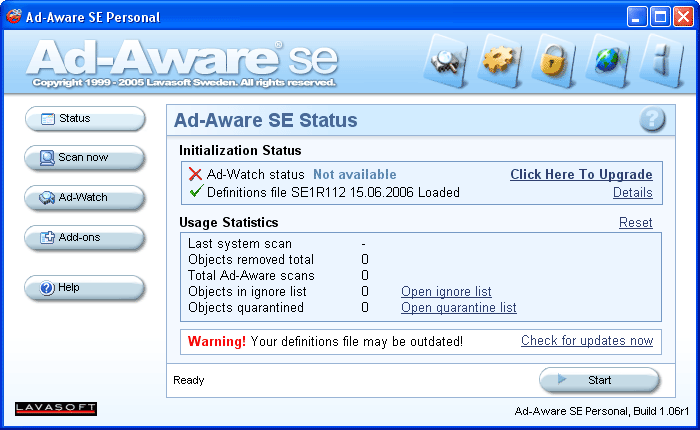
-
Click the Finish button and the Ad-Aware SE Personal window appears showing the Ad-Aware SE Status page:
This is a screenshot - not a real window!
This is a screenshot - not a real window!
|
-
Click the Check for updates now hyperlink and the Performing WebUpdate (Ready) dialog box appears:
This is a screenshot - not a real window!
This is a screenshot - not a real window!
|
-
Click the Connect button:
-
If your definitions are old the message box shown in step 3 appears.
Return to step 4.
- If your definitions are up-to-date this message box appears:
This is a screenshot - not a real window!
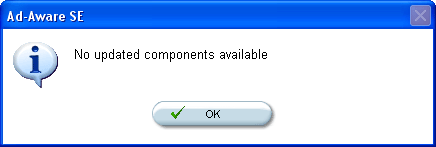
This is a screenshot - not a real window!
|
-
Click the OK button and the Performing WebUpdate (No updates found) dialog box appears:
This is a screenshot - not a real window!

This is a screenshot - not a real window!
|
-
Click the Finish button to return to the Ad-Aware SE Personal window showing the Ad-Aware SE Status page:
This is a screenshot - not a real window!
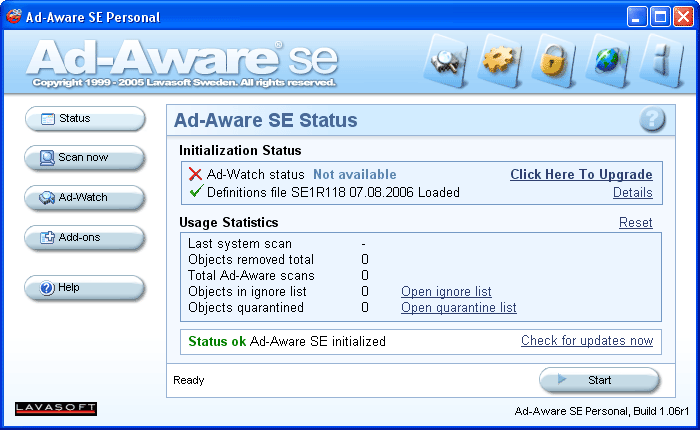
This is a screenshot - not a real window!
|
-
Click the Start button and the Ad-Aware SE Personal window appears showing the Preparing System Scan page:
This is a screenshot - not a real window!
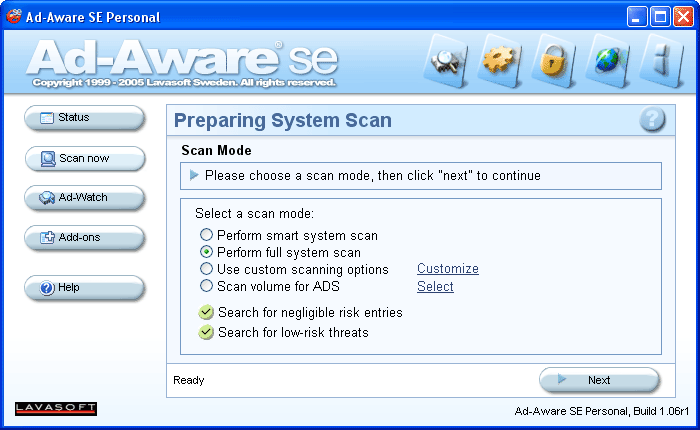
This is a screenshot - not a real window!
|
- Select the Perform full system scan option (as shown above).
- Check the Search for negligible risk entries and Search for low-risk threats checkboxes (as shown above).
-
Click the Next button and Ad-Aware SE Personal shows the Performing System Scan page:
This is a screenshot - not a real window!
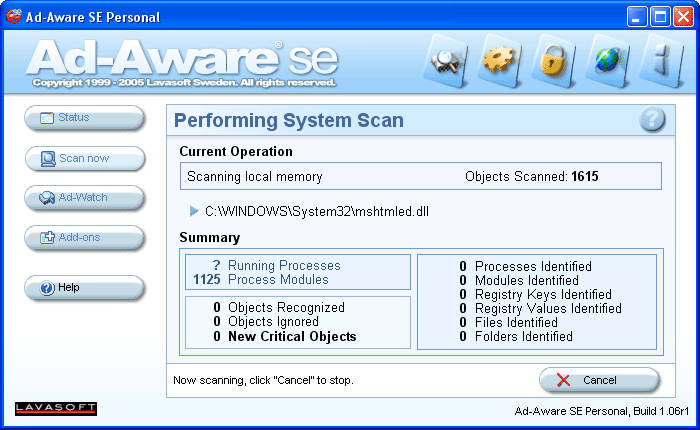
This is a screenshot - not a real window!
|
-
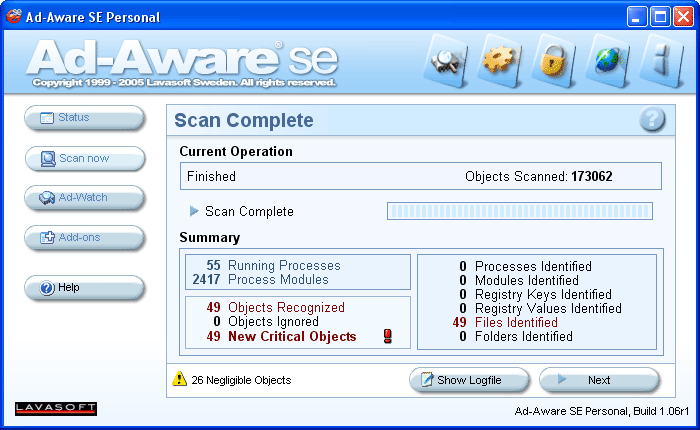
Wait until the scan is complete and Ad-Aware SE Personal shows the Scan Complete page.
This can take a long time,
and if the scan prevents you continuing with your work you can press the Cancel button,
but of course the scan will not be complete:
This is a screenshot - not a real window!
This is a screenshot - not a real window!
|
-
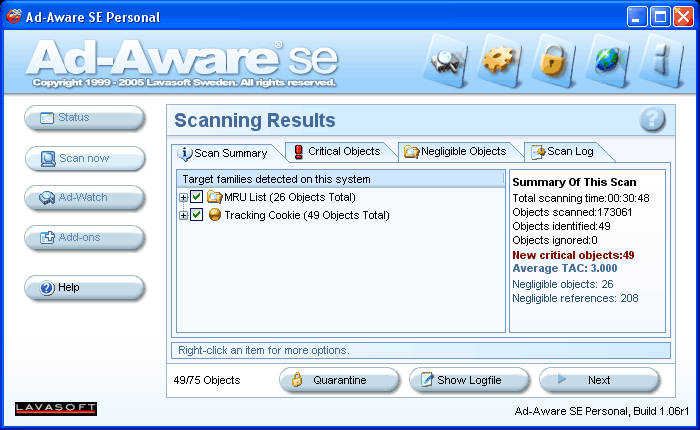
Click the Next button and the Ad-Aware SE Personal shows the Scanning Results page:
This is a screenshot - not a real window!
This is a screenshot - not a real window!
|
- Check all of the checkboxes in the Scan Summary (as shown above).
-
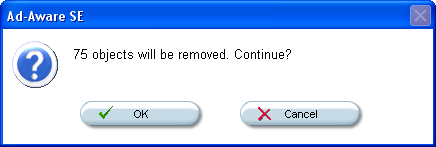
Click the Next button and this message box appears:
This is a screenshot - not a real window!
This is a screenshot - not a real window!
|
-
Click the OK button and Ad-Aware SE Personal shows the Ad-Aware SE Status page as shown in step 10.
You have successfully updated the Ad-Aware SE Personal definitions and deleted spyware.
Norton Internet Security
Use this shortcut to update Norton Internet Security and delete viruses:
-
Double-click the Norton Internet Security shortcut and the Norton Internet Security window appears:
This is a screenshot - not a real window!
This is a screenshot - not a real window!
|
-
Click the LiveUpdate button and the LiveUpdate window appears showing the Welcome page:
This is a screenshot - not a real window!
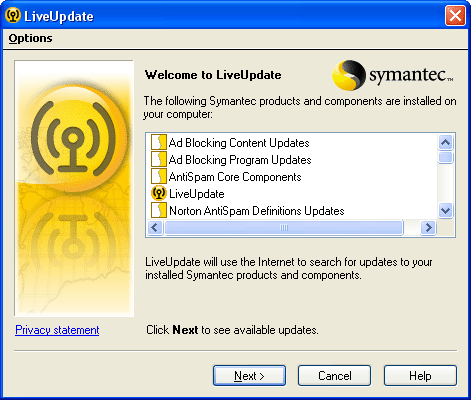
This is a screenshot - not a real window!
|
-
Click the Next button and LiveUpdate searches for updates:
This is a screenshot - not a real window!
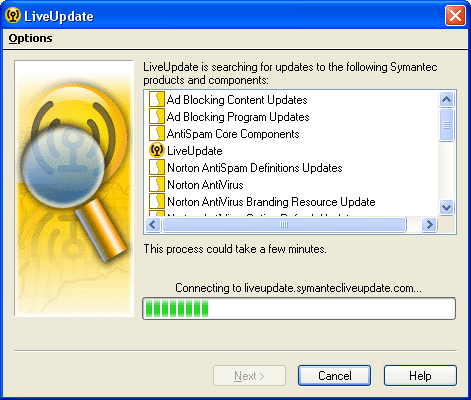
This is a screenshot - not a real window!
|
-
Wait until LiveUpdate has finished searching for updates:
This is a screenshot - not a real window!
This is a screenshot - not a real window!
|
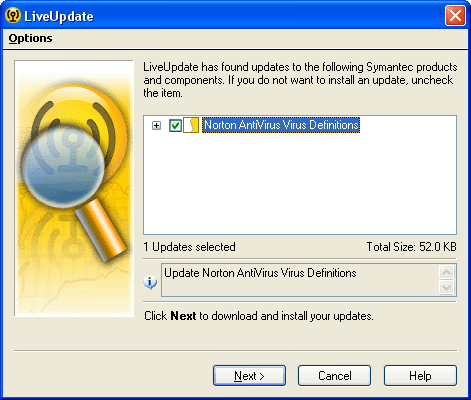
-
Click the Next button and LiveUpdate downloads updates:
This is a screenshot - not a real window!
This is a screenshot - not a real window!
|
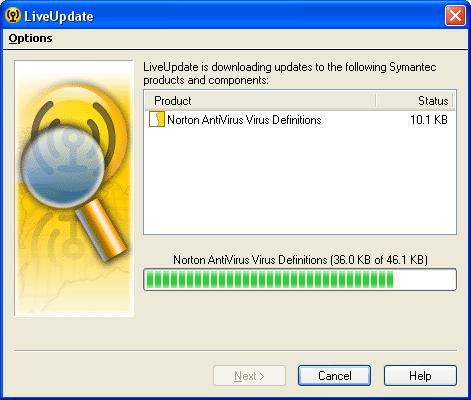
-
Wait while LiveUpdate downloads updates:
This is a screenshot - not a real window!
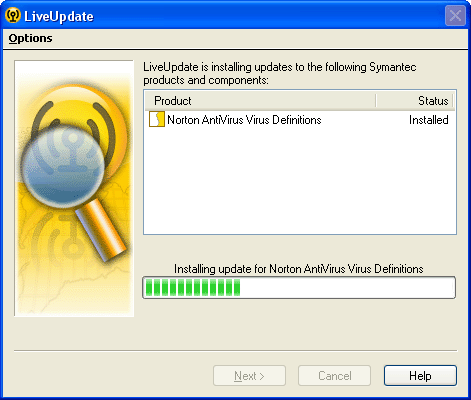
This is a screenshot - not a real window!
|
-
Wait until LiveUpdate has finished installing updates:
This is a screenshot - not a real window!
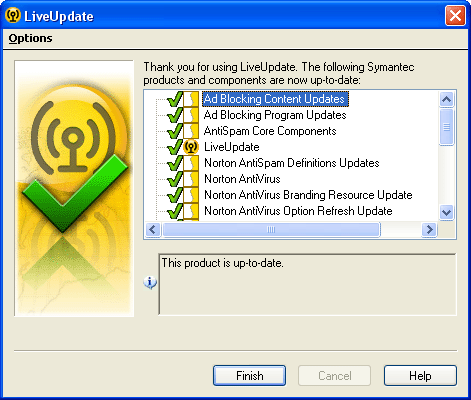
This is a screenshot - not a real window!
|
-
Click the Finish button to return to the Norton Internet Security window:
This is a screenshot - not a real window!
This is a screenshot - not a real window!
|
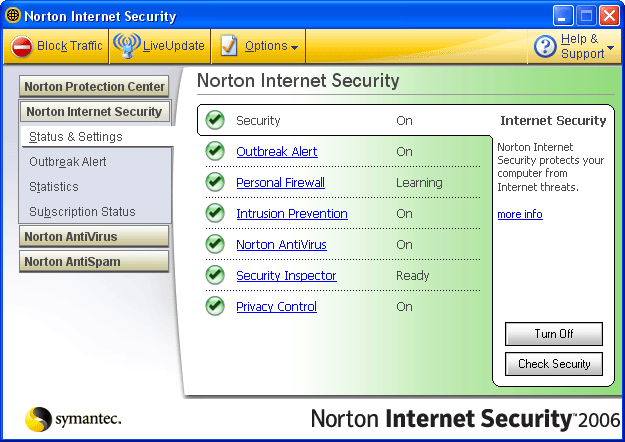
-
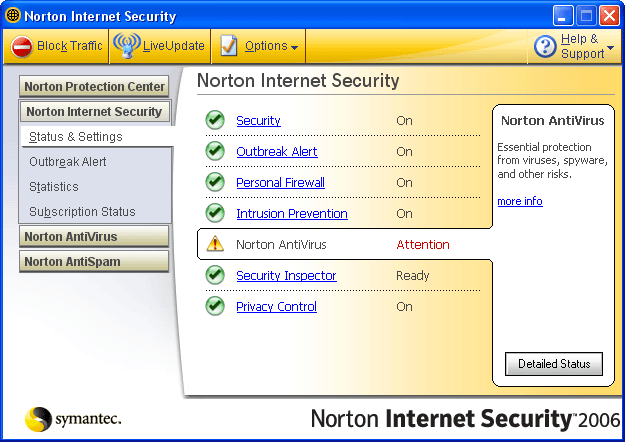
Click the Norton AntiVirus button on the left and Norton Internet Security shows the Status tab on the Norton AntiVirus page:
This is a screenshot - not a real window!
This is a screenshot - not a real window!
|
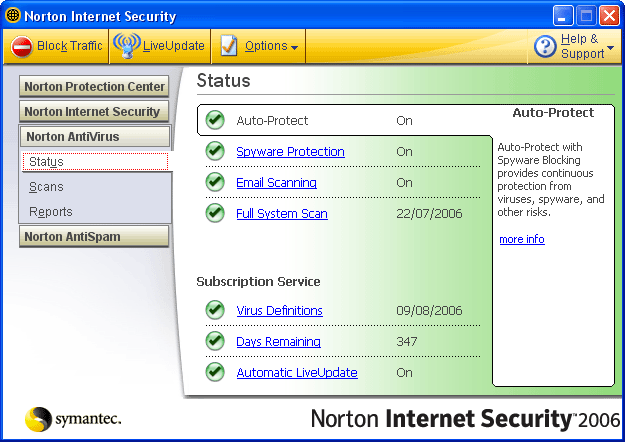
-
Click the Scans hyperlink on the left and Norton Internet Security shows the Scans tab on the Norton AntiVirus page:
This is a screenshot - not a real window!
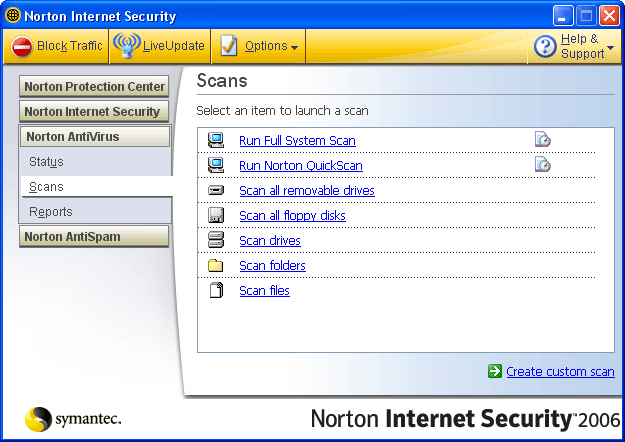
This is a screenshot - not a real window!
|
-
Click the Run Full System Scan hyperlink and the Norton AntiVirus - Scan progress window appears:
This is a screenshot - not a real window!
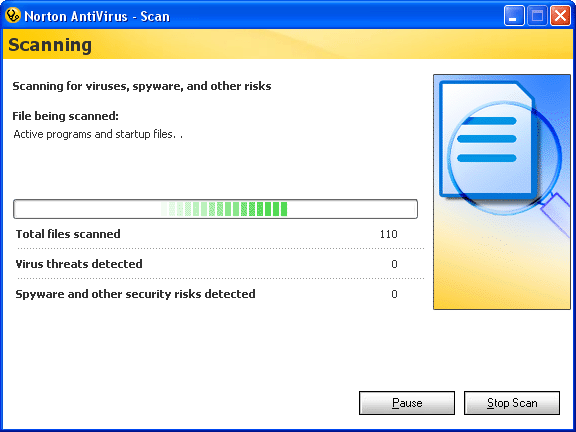
This is a screenshot - not a real window!
|
-
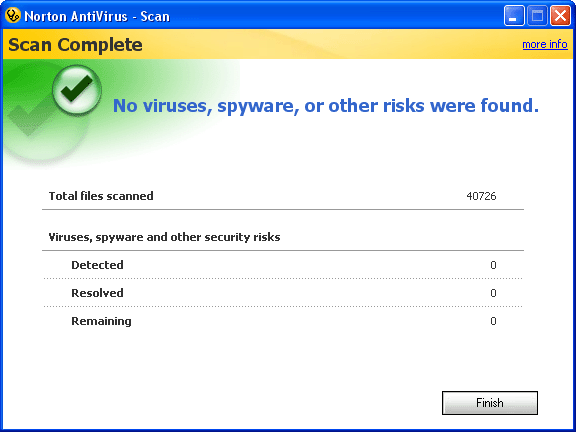
Wait until the scan is complete and Norton AntiVirus shows the Scan Complete window.
This can take a long time,
and if the scan prevents you continuing with your work you can press the Pause or Stop Scan buttons,
but of course the scan will not be complete:
This is a screenshot - not a real window!
This is a screenshot - not a real window!
|
- Click the Finish button to return to the Norton Internet Security window.
-
Close Norton Internet Security.
You have successfully updated Norton Internet Security and scanned for viruses.
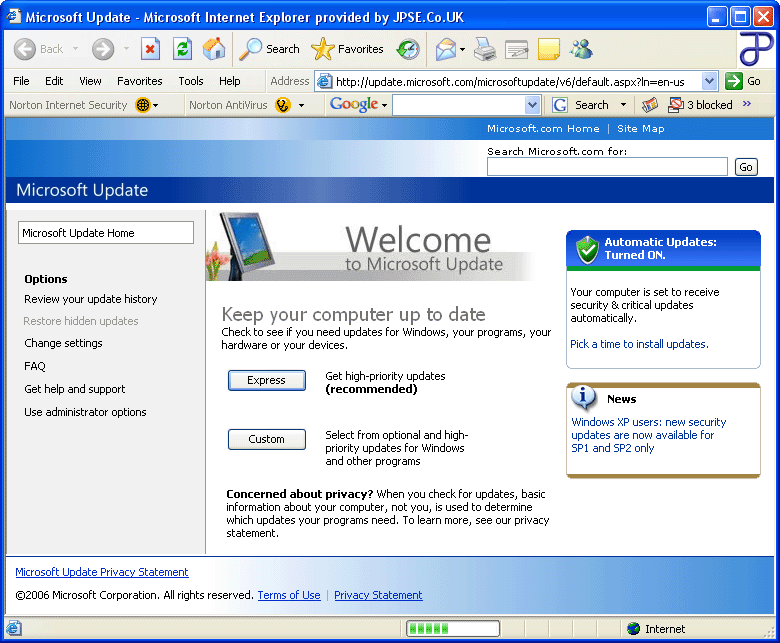
Microsoft Update
Use this shortcut to update your Microsoft Software (Microsoft Windows XP, Microsoft Office, etc):
-
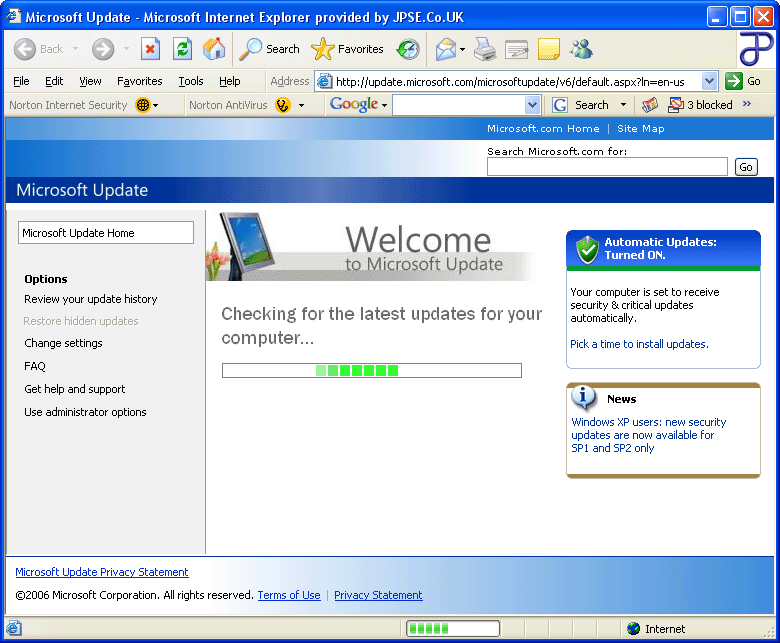
Double-click the Microsoft Update shortcut and the Microsoft Update Home page appears:
This is a screenshot - not a real window!
This is a screenshot - not a real window!
|
-
Click the Custom button and Microsoft Update checks for updates:
This is a screenshot - not a real window!
This is a screenshot - not a real window!
|
-
Wait until Microsoft Update has finished checking for updates and shows the Select High-Priority Updates page:
This is a screenshot - not a real window!
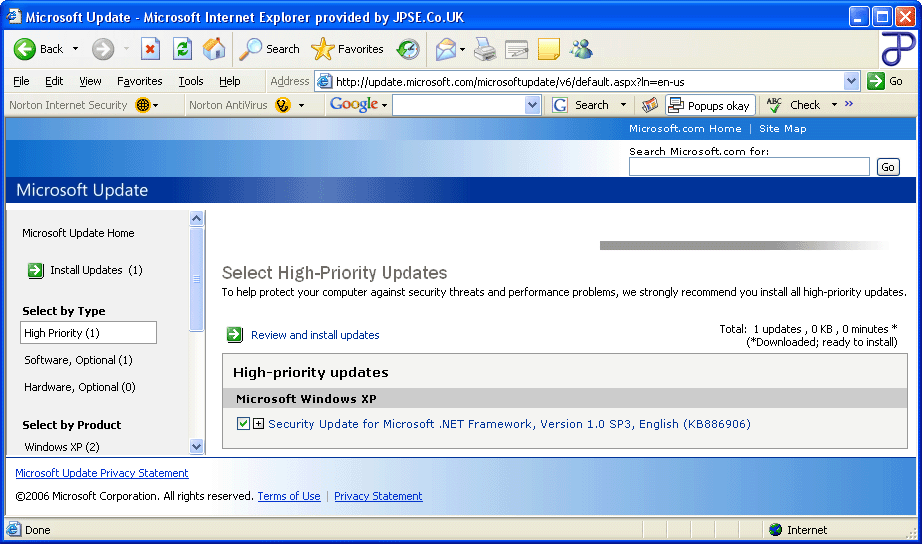
This is a screenshot - not a real window!
|
-
Click the Software, Optional hyperlink on the left and Microsoft Update shows the Select Optional Software Updates page:
This is a screenshot - not a real window!
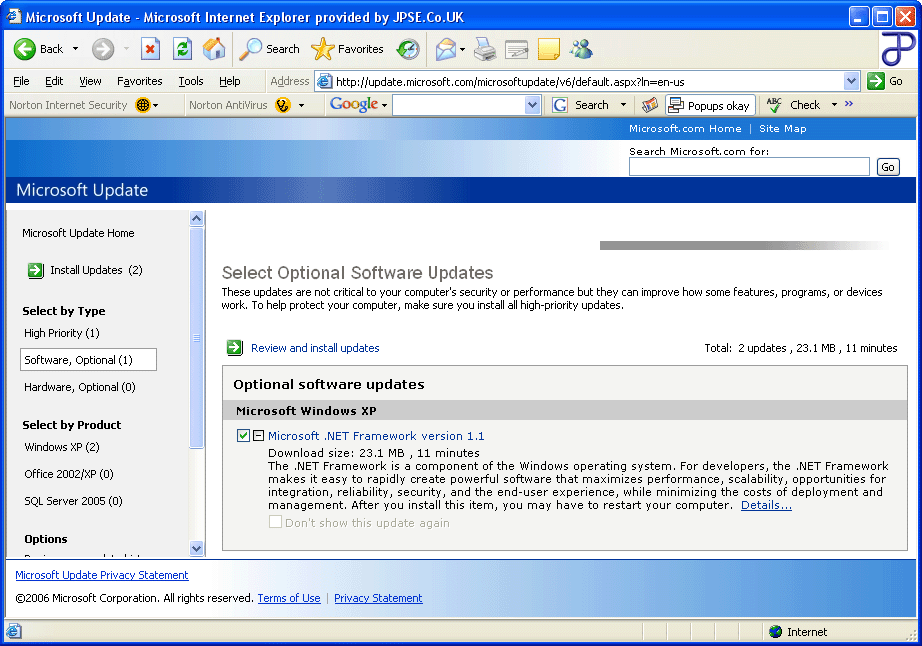
This is a screenshot - not a real window!
|
- Select all of the listed updates (as shown above).
-
Click the Hardware, Optional hyperlink on the left and Microsoft Update shows the Select Optional Hardware Updates page:
This is a screenshot - not a real window!
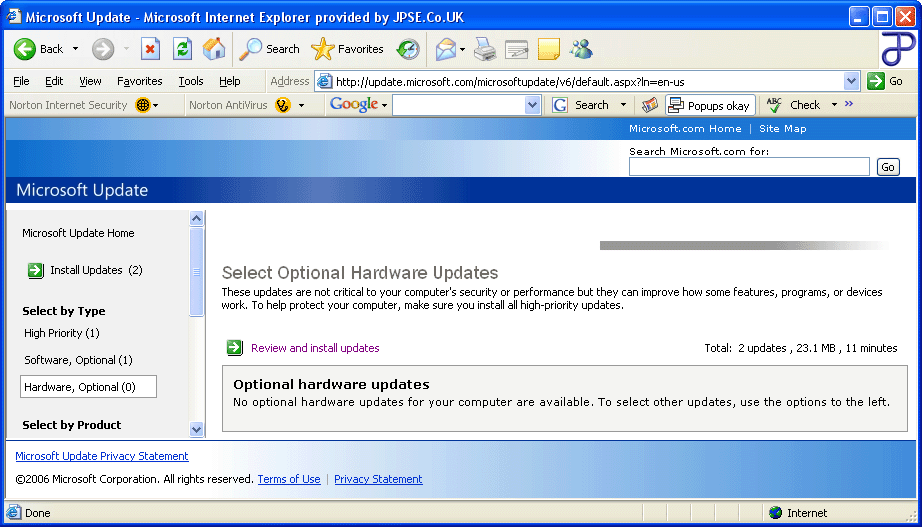
This is a screenshot - not a real window!
|
- Select all of the listed updates. There are none shown above because the computer already had all of the optional hardware updates installed.
-
Click the Review and install updates hyperlink and Windows Update shows the Review and Install Updates page:
This is a screenshot - not a real window!
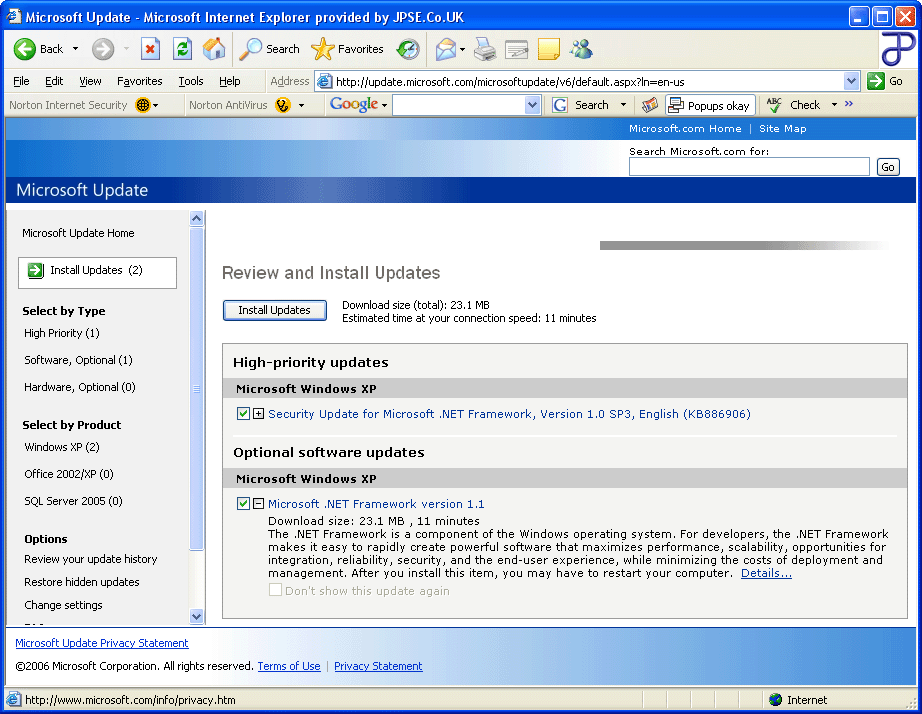
This is a screenshot - not a real window!
|
-
Click the Install Updates button and the Installing Updates progress box appears:
This is a screenshot - not a real window!
This is a screenshot - not a real window!
|
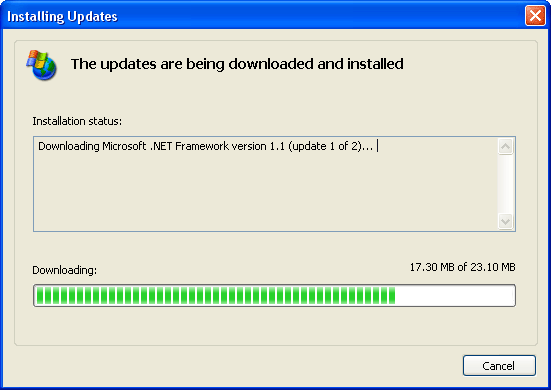
-
Wait until the updates have been downloaded:
This is a screenshot - not a real window!
This is a screenshot - not a real window!
|
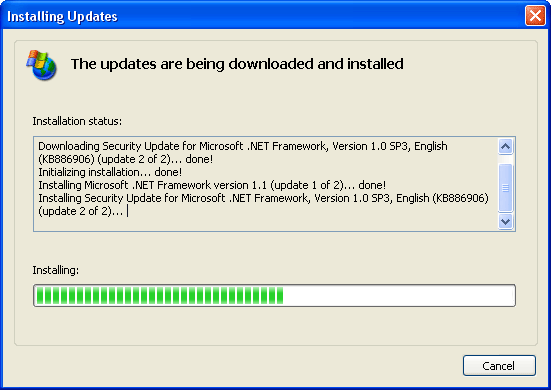
-
Wait until the updates have been installed and this dialog box appears:
This is a screenshot - not a real window!
This is a screenshot - not a real window!
|
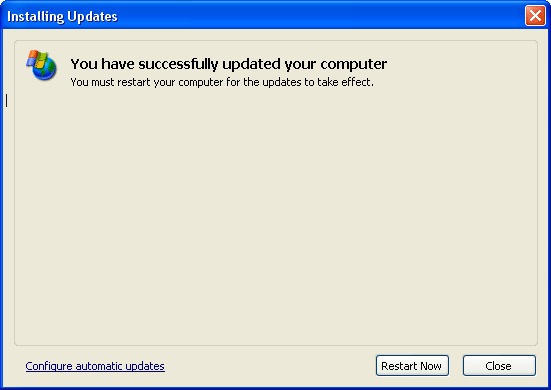
-
Close all other open programs,
then click the Restart Now button and your computer will restart.
If you wish, you may click the Close button instead and Microsoft Update shows the Review Your Installation Results page:
This is a screenshot - not a real window!

This is a screenshot - not a real window!
|
-
Close the Microsoft Update window and restart your computer.
You have successfully downloaded and installed updates using Microsoft Update.
Disk Defragmenter
Use this shortcut to tidy up the physical distribution of data on your hard disk:
-
Double-click the Disk Defragmenter shortcut and the Disk Defragmenter window appears:
This is a screenshot - not a real window!
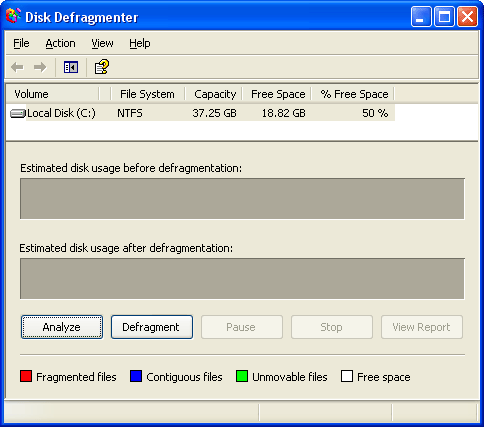
This is a screenshot - not a real window!
|
-
Click the Defragment button and Disk Defragmenter starts analysing your hard disk:
This is a screenshot - not a real window!
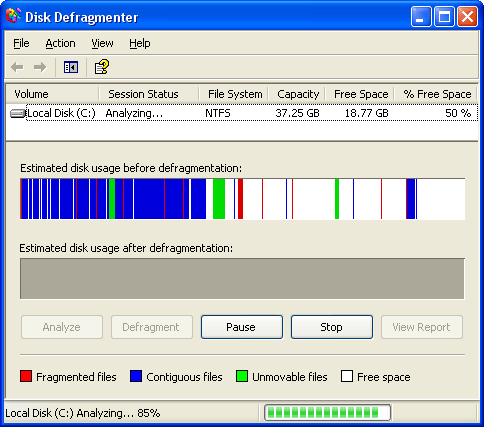
This is a screenshot - not a real window!
|
-
When Disk Defragmenter has finished analysing your hard disk it will start compacting files:
This is a screenshot - not a real window!
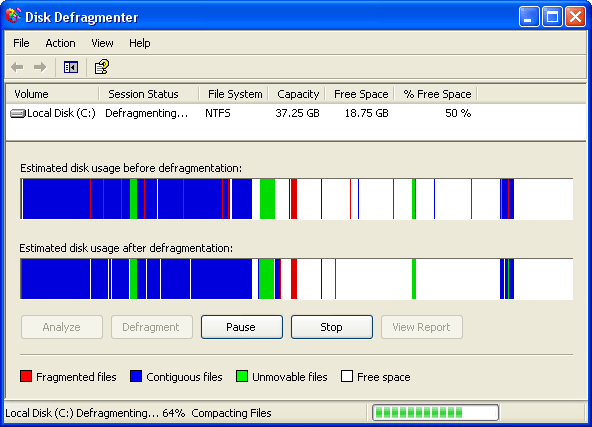
This is a screenshot - not a real window!
|
-
Wait until Disk Defragmenter has finished compacting files and this message box appears:
This is a screenshot - not a real window!
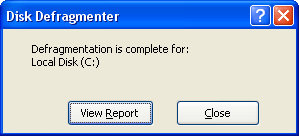
This is a screenshot - not a real window!
|
- Click the Close button to return to the Disk Defragmenter window.
-
Close the Disk Defragmenter.
You have successfully defragmented your hard disk and completed a typical manual maintenance cycle!
©2020 Jann Padley, Last Modified:
February 16 2023 15:09:14.
|
