|
Home Support Engineering Software Engineering Sensory Experience Spare Equipment |
Accessible/Content-Only/Printer-Friendly Jann Padley Sensory Experience Telephone: 01452-840714 (UK) Mobile: 07800-603610 (UK) Enquiries@JPSE.Co.UK |
| Introduction | |
| Fine Art Prints | |
| Fine Art Print Details | |
| Reproduction | |
| Colour Theory | |
| Colour Management | |
| Materials and Methods |

|
| Colour Managed Workflow | |
| Book With No Words |
Materials & Methods
Materials
With a basic understanding of the principles of Colour Theory and Colour Management, it is possible to select appropriate equipment and software, and set up the studio:
Studio
The studio was a whitewashed room about 20 x 10 feet, with curtains that block out all daylight. White sheets were placed over the floorboards to provide diffuse white illumination, matching the ceiling and making the most of the available light. Shelving racks were mounted at one end of the studio so that pictures could easily be displayed at the correct height. Black sheets draped behind the pictures absorbed any light transmitted through the pictures.
Lights

Four 2 x 500 Watt Tungsten Halogen site lights (4 kilowatts in total) were fitted with RoscoLux Tough White Diffusion theatrical gel to diffuse the beam without affecting colour temperature. The lights were arranged in a horizontal arc at a height of about 1.75 meters and a distance of about 2.5 meters from the pictures to provide even illumination.
Computer
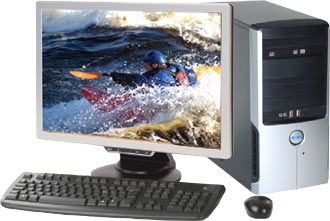
A standard Intel x86-based (Pentium 4) Personal Computer ran Microsoft Windows XP Service Pack 2, VueScan, S7RAW, Argyll Colour Management System and Adobe Photoshop among other things. The hard disk was upgraded to 160GB and a second identical drive installed as a backup. A reasonable graphics card (ATI Radeon 7000 Series) and monitor (Mitsubishi DiamondScan 90e 19" CRT) were added and calibrated using the Pantone ColorVision Spyder II Pro. Please note that CRT (Cathode Ray Tube) monitors have better contrast and colour purity than LCD (Liquid Crystal Display) monitors, but the latest TFT (Thin-film Transistor) monitors are catching up fast...
Calibration Target
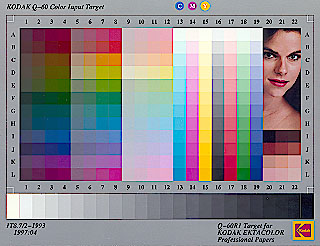
The 5" x 7" Reflective Kodak IT8 Q60 Colour Input Target was used to calibrate the scanner and camera. This is a printed card that contains squares whose colour is precisely defined in a Q60 file that can be downloaded from the Kodak website.
Calibration Software
Argyll Colour Management System by Graeme Gill is an open-source set of command-line utilities that creates extremely accurate profiles.
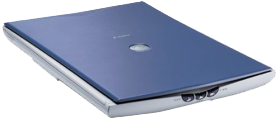
Scanner
VueScan Standard Edition by Ed Hamrick was used to acquire images from a Canon CanoScan N670U LIDE A4 Flatbed Scanner.
Camera
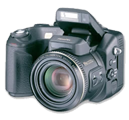
Photographs were taken using the Fuji FinePix S7000 Zoom on mains power and a standard tripod at a fixed height. We also attached the Fuji AR FX9 Adapter Ring and a Jessops 80A Daylight Filter, to effectively increase the colour temperature of the tungsten halogen lights from 3200 Kelvin to 5500 Kelvin. We used S7RAW from AIWIL soft to convert the RAW image files into TIFF files.
Printer
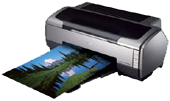
We used the Epson R1800 A3+ Photo Printer. It uses the Epson UltraChrome Archival Pigment Ink. This is a 6-colour printer (cyan, magenta, yellow, black, red and blue) so it produces fantastic colour. Depending on the conditions the ink is lightfast for about 75 years. The variable droplet size technology prints to such a high resolution that the pixels cannot be seen with the naked eye - printing artefacts can only be seen under the microscope.
Paper
Please note that prints must be viewed under a "true" white light. The exact choice of paper depends on the intended purpose. After carefully testing dozens of papers we chose:
| Paper | Usage | Qualities |
|---|---|---|
| Hahnemuhle Photorag | Fine art print | Incredible clarity and vividness |
| Hahnemuhle Lumijet Velvet | Book block Endpaper |
Soft and warm but also vivid Thin and flexible but also strong |
| InkJetArt Fast-Dry Matte Canvas | Book cover | Very tough Real canvas but works great with pigment inks |
| InkJetArt Micro Ceramic Luster | Dust jacket | Smooth durable surface without specular reflections |
Methods
- Capture accurate data
- Disable all unnecessary colour adjustments, leaving the original data as pure as possible
- Perform as little colour management as possible, using only Argyll Colour Management System and Adobe Photoshop
Computer
- RGB Working Space: AIM RGB Pro = WideGamut D65 G1.00
- Colour Management Policies: Preserve Embedded Profiles, Ask
-
Conversion Options
- Engine: Adobe (ACE)
- Intent: Relative Colorimetric
- Use Black Point Compensation: Off
Calibration Software
Argyll Colour Management System by Graeme Gill was used to create Ultra Quality LUT Profiles for the scanner, camera and printer/paper/ink combinations. The brightest patch on the Kodak IT8 Q60 Colour Input Target (Dmax) is only about 80% reflective, which means that a standard profile cannot represent colours that are brighter than those on the target. Bright colours are clipped or adjusted to the brightest available colour, and highlights are lost. However, Argyll Colour Management System can create profiles with Absolute Colorimetric Rendering Intent. We used this mode for scanner and camera profiles, so that bright colours were captured without clipping.
Scanner
The scanner was allowed to warm-up and the auto-calibration routine was run before use. VueScan Standard Edition by Ed Hamrick was configured to output 48 bit RGB (16bpp) TIFF Files with no colour adjustment.
Camera
-
SET Mode
- CCD-RAW: On
-
Manual Mode
- Aperture: F3.2
- Exposure: 1/20th and 1/25th seconds
-
Focal Length: 24mm
(not equivalent to the focal length of a 35mm camera, because of the small CCD) - FinePix Settings, ISO: 200
-
Menu
- White Balance: Daylight
- AF Mode: Center
- Photometry: Not applicable
- Sharpness: Normal
- Timer: On
All camera settings - including the focal length (zoom position) - were kept the same throughout to ensure consistent results. Because we used the camera in timer mode there was no restriction on exposure, and thus no restriction on film speed (ISO200), aperture (F3.2) or focal length (24mm), which were chosen for optimum results.
Even with the Jessops 80A Daylight Filter the resulting images still had a slightly low colour temperature (that is, the levels of red were slightly high and the levels of blue were slightly low). The exposure was chosen so that no colours were clipped.
- Output: 16bit TIFF (means 48 bit RGB (16bpp) TIFF)
- Sharpness: Normal
- White Balance: Daylight (no adjustment)
- Sensitization: 0, Contrast: 0, Brightness: 0, Saturation: 0, Hue: 0
- Gamma: 1, Moire Cancel: 1
- Color Space: sRGB (not relevant because we will attach our own profile to the file)
-
Lens Correction
- Distortion: -35 (barrel distortion corrected using a large rectilinear test grid)
- Vignetting Amount: 35, Vignetting Midpoint: 60
Printer
-
Paper & Quality Options
- Manual - Roll, Best Photo
-
Choose the most appropriate paper type:
- Hahnemuhle Photorag choose Archival Matte Paper
- Hahnemuhle Lumijet Velvet choose Velvet Fine Art Paper
- InkJetArt Micro Ceramic Luster choose Premium Luster Photo Paper
-
Print Options
- High Speed: No
- Grayscale: No
- Edge Smoothing: No
- Color Management: ICM Off